Photography lighting is one of the most important—and most misunderstood—elements of taking great photos. You can own the most expensive camera, but without proper lighting, your images can still look flat, blurry, or unprofessional. On the other hand, when lighting is used intentionally, even a smartphone photo can look polished and high-quality.
At Shutter Shuffle, we believe photography lighting basics are the foundation of every great image. Whether you’re shooting portraits, product photos, or social media content, understanding light will instantly elevate your work.
This complete beginner-friendly guide explains how lighting works, how to use natural and artificial light, common mistakes to avoid, and how lighting impacts mood and quality.
Why Lighting Is So Important in Photography
Lighting affects nearly every part of a photo—from exposure to emotion. Without good lighting, details disappear, colors lose accuracy, and images feel unbalanced.
Good lighting helps:
- Highlight your subject
- Create depth and dimension
- Set the mood of the image
- Guide the viewer’s eye
- Make photos look professional
Think of lighting as the paintbrush of photography. Mastering photography lighting basics allows you to control how your images look and feel instead of leaving results up to chance.
Understanding the Basics of Light
Before using specific lighting tools or setups, it’s important to understand how light behaves. Every photographer should know these three core elements.
Light Direction
Light direction refers to where the light source is positioned in relation to your subject.
Common lighting directions include:
- Front lighting: Light comes from behind the camera and evenly lights the subject
- Side lighting: Light comes from the left or right, creating shadows and depth
- Backlighting: Light comes from behind the subject, creating silhouettes or glow
- Top lighting: Light comes from above, often causing harsh shadows
Side lighting is often the most flattering because it adds dimension and texture, especially for portraits and product photography.
Light Intensity
Light intensity describes how bright the light is.
- Bright light = strong shadows and high contrast
- Soft light = gentle shadows and smoother transitions
Too much light causes overexposure, while too little light leads to dark or grainy images. Balanced exposure ensures details remain visible in both highlights and shadows.
Light Quality (Hard vs. Soft Light)
Light quality refers to how harsh or soft the shadows appear.
- Hard light: Sharp shadows and strong contrast (midday sun, direct flash)
- Soft light: Even tones and smooth shadows (cloudy skies, window light)
Beginners should prioritize soft light, as it’s more forgiving and flattering for most subjects.
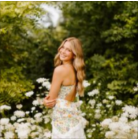
Natural Light Photography
Natural light is one of the easiest and most accessible lighting options. It’s free, versatile, and ideal for learning photography lighting basics. If you want a deeper breakdown with real shooting examples, check out our Natural Light Photography Tips guide to see how lighting changes throughout the day.
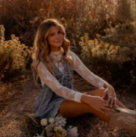
Golden Hour vs. Midday Light
Golden hour occurs shortly after sunrise and before sunset, when the sun sits lower in the sky.
Benefits of golden hour lighting include:
- Soft shadows
- Warm skin tones
- Even lighting
- Cinematic feel
Midday light is much harsher, creating deep shadows and high contrast. When shooting midday, look for shade or use diffusion to soften the light.
Window Light Photography
Window light is one of the best tools for indoor photography.
To use window light effectively:
- Position your subject facing the window
- Use sheer curtains to soften harsh light
- Turn off indoor lights to avoid color mixing
- Adjust distance from the window to control contrast
Window light works especially well for portraits, food photography, and lifestyle content.
Outdoor Natural Light Tips
When shooting outdoors:
- Avoid direct sunlight when possible
- Use open shade for even lighting
- Watch how clouds change brightness
- Bounce light using white walls or reflectors
Learning to read natural light takes practice, but it’s one of the most valuable photography skills you can develop.
Artificial Lighting in Photography
Artificial lighting gives you control when natural light isn’t available or consistent. For a more detailed breakdown of tools and beginner-friendly setups, explore our Artificial Lighting for Photography guide.

Continuous Lighting
Continuous lights stay on at all times, making them ideal for beginners.
Common types include:
- Ring lights
- LED panels
- Softbox lights
These lights are easy to use because you can see exactly how the light affects your subject before taking the photo.
Flash and Speedlights
Flashes emit a quick burst of light and are commonly used in event and portrait photography.
Pros:
- Powerful light source
- Freezes motion
- Works in low-light situations
Cons:
- Steeper learning curve
- Can look harsh if misused
Using diffusers or bouncing flash off walls helps create softer, more natural results.
Studio Lighting Basics
Studio lighting setups often include:
- Key light: Main light source
- Fill light: Softens shadows
- Backlight: Adds separation from the background
Understanding these basics can dramatically improve photo quality, even with minimal equipment.
Common Lighting Mistakes to Avoid
Lighting mistakes can quickly reduce image quality. These are the most common beginner errors.
Harsh Shadows
Harsh shadows are caused by overly direct light. Fix this by:
- Moving your subject into shade
- Using diffusion
- Bouncing light off walls or reflectors
Overexposure and Underexposure
Overexposed photos lose highlight detail, while underexposed photos lose shadow detail. Always review exposure and adjust before shooting.
Mixing Different Light Sources
Combining daylight with indoor lighting can cause unnatural color tones. Stick to one light source whenever possible.
Lighting Setups for Different Photography Styles
Portrait Photography
Portrait lighting should be flattering and natural. Soft, directional light—such as window light or softboxes—works best. Avoid harsh overhead lighting, and for step-by-step examples, visit our Portrait Lighting Setup Guide.
Product Photography
Product images require even lighting, minimal shadows, and neutral backgrounds. Softboxes and light tents are especially effective for achieving clean, professional results.
Social Media & Content Creation
For content creators and brands:
- Ring lights offer consistency
- Window light provides a natural look
- Clean backgrounds keep focus on the subject
Consistent lighting strengthens branding and boosts engagement.
How Lighting Transforms Photos
Lighting can completely change how an image feels. The same subject photographed under different lighting conditions can appear dramatic, calm, energetic, or emotional.
Good lighting:
- Enhances facial features
- Improves color accuracy
- Adds professionalism
- Builds visual trust
This is why professional photographers prioritize lighting in every shoot.
Final Tips for Mastering Photography Lighting Basics
- Practice in different lighting conditions
- Study how light falls on objects
- Experiment with angles and distance
- Review images and adjust
- Learn from mistakes—they’re essential
Lighting is a skill, not a talent.
Conclusion
Photography lighting basics are the foundation of great photography. When you understand how light works—and how to control it—you gain creative freedom and consistency in your images.
Whether you’re a beginner, content creator, or small business owner, better lighting leads to better photos—and better photos create stronger visual impact. Explore our other photography guides or book a session with Shutter Shuffle to see how professional lighting can transform your content.